On this page
- The three rules, and why a well-made puzzle never needs a guess
- How notes, the hint, undo, printing and the daily puzzle work on this screen
- The solving techniques the hint explains, each with a figure from one of our own puzzles
- How the levels differ, with counts taken from our own puzzle bank
- Answers to common questions, with sources
How to play Sudoku
Sudoku is played on a 9×9 grid made of nine 3×3 boxes. Some cells start filled. You fill the rest with the digits 1 to 9, using logic alone. There is no arithmetic.
The three rules
- Each row holds the digits 1 to 9 exactly once.
- Each column holds the digits 1 to 9 exactly once.
- Each 3×3 box holds the digits 1 to 9 exactly once.
Solving guides call any row, column or box a house. This page uses that word too.
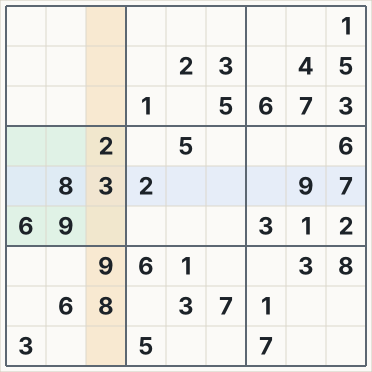
One solution, and no guessing
A well-posed Sudoku has a single solution (Wikipedia, checked 2026-10-18). That is why logic is enough: the starting digits leave exactly one way to finish.
We check every puzzle here for a single solution. Every puzzle currently in our bank can be solved with the techniques further down this page, with no trial and error. If you feel you have to guess, a technique is probably waiting to be spotted. The hint is built to find it.
How to use this screen
The board works with touch, a mouse or a keyboard.
Place digits and notes
- Digits: select a cell, then press a digit on the pad or on your keyboard. Entering the same digit again clears the cell.
- Pad counters: the small number under each digit on the pad is how many of that digit are still missing. It disappears when all nine are on the board. Wrong digits count too.
- Notes: switch on Notes (key N) to write small candidate digits in a cell instead of an answer. With Notes off, hold Shift and press a digit to add or remove one note.
- Auto-remove notes: on by default. Placing a digit removes it from the notes in its row, column and box. Undo brings them back.
- Fill all notes: in the More menu. It replaces the notes in every empty cell with each digit that the digits on the board do not rule out, so any notes you wrote are overwritten. It is a single undo step, and the result screen records that you used it.
- Locked digits: the digits that came with the puzzle, and digits placed by a hint, cannot be changed (Undo can take back a hint’s digit, but the hint still counts). With Highlights on, pressing a digit on a locked cell lights every copy of that digit.
With Highlights on, you can also press a digit before selecting any cell. Every cell holding it lights up, which makes a quick scan for gaps.
Highlights, clashes and mistakes
- Highlights: selecting a cell tints its row, column and box, and lights every cell with the same digit.
- Clashes: a digit that repeats inside a row, column or box gets a red-tinted cell, whether or not the digit is correct in the end.
- Show mistakes: on by default. A digit that does not match the solution turns red, and the counter above the board adds one. Each cell is counted once until you fix it.
- Settings: open More, then Settings. You can switch Show mistakes, Highlights, Show clock and Auto-remove notes on or off. Turning off Show mistakes hides the red digits and the counter and leaves mistakes out of the result. Mistakes are still counted, and the hint still points to a wrong digit.
How the hint works
The Hint button (or the H key) does not hand you the answer straight away. It works in three stages, and only the last one counts against you.
| Stage | Button | What the board and panel show | Counts as a hint |
|---|---|---|---|
| 1 | Hint | “Look at row 5.” That row, column or box is outlined. | No |
| 2 | Show how | The technique’s name and a plain-English reason. The pattern cells are marked and the candidates it removes are crossed out. | No |
| 3 | Fill it in | The digit goes into the cell and is locked. | Yes |
Sometimes one technique is not enough to reach a digit. The hint then splits the way there into steps. After Show how, the panel reads “Step 1 of 3”. Each step names its own technique and crosses out its own candidates, and the button says Next step until the last step, which ends with Fill it in.
For a single, the panel shows the cell but never the digit. You work the digit out, then press Fill it in or type it yourself.
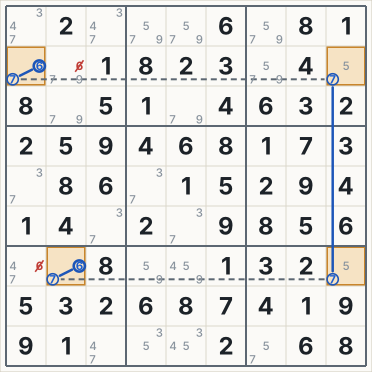
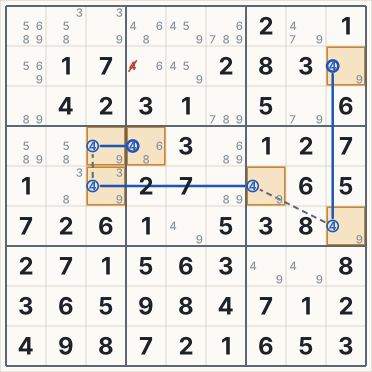
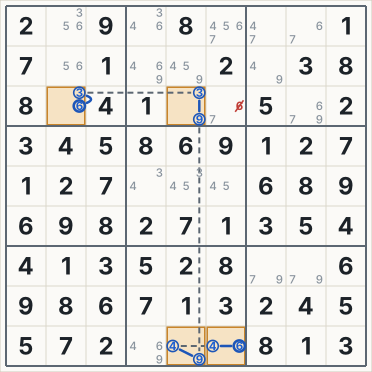
On Master, a chain step draws the whole chain on the board at once: a ring on each candidate in the chain, a solid line for a strong link, a dashed line for a weak link, and thicker rings with bold digits at the two ends. On a screen at least 900 pixels wide, the panel also spells the chain out cell by cell, for example “Row 2, column 4 is not 7 → row 2, column 8 is 7 → …”. A screen reader hears the same sequence and the list of crossed-out candidates.
If a digit on the board is wrong, the hint deals with that first: “There is a mistake in row 3,” then Show the cell, then Erase it. Erasing a mistake does not count as a hint.
Hints read the digits on the board and ignore your notes, so a wrong note cannot mislead them. Master has one exception. If every empty cell has notes and each cell’s notes still include its correct digit, the hint continues from your notes, so it does not repeat eliminations you have already made. When you press Fill it in, the candidates that hint crossed out also leave your notes (one Undo brings back both the digit and those notes). If even one cell has lost its correct digit, the hint goes back to the digits alone. The panel’s wording is the same wording used in the figures below. Hints are unlimited. Only Fill it in counts, and the result screen shows how many you used.
Keyboard shortcuts
| Action | Keys |
|---|---|
| Move between cells (wraps at the edges) | Arrow keys |
| Enter a digit | 1–9 |
| Add or remove a note | Shift + 1–9 |
| Notes on or off | N |
| Erase the cell | Backspace, Delete or 0 |
| Undo | Ctrl + Z (⌘ + Z on a Mac) |
| Hint | H |
| Pause or resume | P |
| Close a panel, resume, or open the restart prompt | Esc |
Undo, pause, restart and print
- Undo: there is no limit. Each action is one step, including notes.
- Pause: the button or P stops the clock and covers the board. The clock also stops when you leave the tab. It starts the first time you touch the board, a button or a key, so reading this page costs no time.
- Restart: More, then Restart (or Esc), asks first. If you confirm, the same puzzle starts over: the board, notes, mistake count, hints and clock all reset.
- Print: More, then Print, or your browser’s print command, prints the puzzle as it was given. It fits on one page, with the level and date at the top.
- Saving: your game saves automatically on this device. There is one unfinished board for the daily puzzle and one for each level, so switching levels does not lose your place.
Today’s daily puzzle
The daily puzzle is the same for everyone who plays on the same calendar date. A new one starts at midnight, your time. Once you have solved it, Replay as practice lets you play it again without touching your stats.
The daily level follows the weekday: Monday Easy, Tuesday and Wednesday Medium, Thursday and Friday Hard, Saturday Expert, Sunday Medium. Master is never a daily puzzle. It is in free play only.
On a Hard or Expert daily, the Easier button moves you to free play at Medium, or at Easy if Easy was your last free-play level, continuing any unfinished board there. Your daily progress stays saved.
Free play and your records
- Free play: pick a level from the menu above the board. Each new puzzle is picked at random from that level’s bank and reshuffled, so a puzzle can come round again in a different disguise. After a free-play solve, the result screen offers the next level up, unless you were on Master, the highest level.
- Records: for each level the game keeps puzzles solved, best time, the average of your last 20, and how many you solved without hints, plus your daily streak. On a screen at least 900 pixels wide they sit in the column beside the board, next to the key list. On a phone that column is hidden, and after a solve the result screen shows how many you have played and your best time, plus your streak after a daily.
- Result screen: it shows time, mistakes, hints, and whether you used Fill all notes. It also lists the techniques the puzzle needed, in the form “Naked Pair ×2”.
- Sharing: Copy result gives you a one-line summary with no digits of the solution. Share image makes a picture of the result.
- Where it lives: records, settings and saved boards stay in your browser on this device. There are no accounts and no leaderboard. Clearing the site’s data clears them.
A solving routine that works
Most puzzles fall to the same loop. Do the cheap checks first, then reach for notes only when you have to.
- Sweep the digits. Start with the digit that already has the most copies on the board. Use its rows and columns to block cells in each box. Where one open cell is left in a box, the digit goes there (a Hidden Single).
- Sweep the cells. Check cells in crowded rows, columns and boxes. A cell that sees eight different digits can only be the ninth (a Naked Single).
- Repeat after every placement. A new digit blocks cells in its row, column and box, so it often creates the next single. Finish all the singles before anything else.
- Write notes when the singles stop. Fill all notes does it in one press. Notes cost effort, but every technique from Pointing on works on candidates.
- Walk up the techniques. Try Pointing and Claiming, then pairs and triples, then X-Wing and the rest. Take the cheapest pattern you can find.
- Go back to the singles. An elimination is worth little until it creates a placement, so scan for singles again after each one.
A few habits make this faster:
- Work one digit at a time. Press a digit with nothing selected and the grid shows where it already stands.
- Check houses with few empty cells. A row with four gaps has far fewer options than a box with eight.
- When the board stops making sense, look for a wrong digit. A cell with no candidates, or a digit with no place left in a house, means an earlier digit is wrong. Show mistakes or a hint will find it.
- Print a puzzle to solve on paper. The printout is the puzzle as it was given, so you can try your own notation.
The solving techniques, cheapest first
These are the techniques the hint can explain, in the order the game’s solver tries them. Apart from the two singles, which show a puzzle’s starting board, each figure below is one of our own puzzles at a moment when the singles have run out. That makes the candidates easy to check: they come from the visible digits and nothing else.
| Technique | The idea in one line | First used at |
|---|---|---|
| Naked Single | A cell has only one candidate left | Easy |
| Hidden Single | A digit fits only one cell of a row, column or box | Easy |
| Pointing | A box’s only spots for a digit line up, so the rest of that line loses it | Medium |
| Claiming | A line’s only spots for a digit sit in one box, so the rest of that box loses it | Medium |
| Naked Pair | Two cells share the same two candidates, so the rest of the house loses them | Medium |
| Hidden Pair | Two digits fit only two cells, so those cells lose every other candidate | Hard |
| Naked Triple | Three cells hold only three digits between them, so the rest of the house loses them | Hard |
| Hidden Triple | Three digits fit only three cells, so those cells lose every other candidate | Hard |
| X-Wing | A digit has two spots in each of two lines, and the spots share two cross lines | Hard |
| Skyscraper | Two lines with two spots each for a digit, joined at one end | Expert |
| 2-String Kite | A row and a column with two spots each for a digit, joined through a box | Expert |
| Swordfish | The same idea as an X-Wing with three lines and three cross lines | Expert |
| XY-Wing | A pivot and two wings put a digit in one of the wings | Expert |
| XYZ-Wing | A three-candidate pivot and two wings put a digit in one of the three cells | Expert |
| Naked Quad | The pair and triple idea with four cells | Expert |
| Hidden Quad | The pair and triple idea with four digits | Expert |
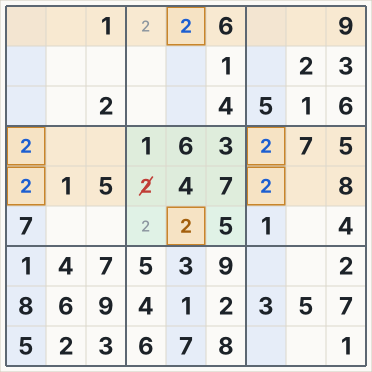
| Finned X-Wing | An X-Wing with a few extra spots (the fin) in one box; only cells that also see the fin lose the digit | Master |
| W-Wing | Two identical two-candidate cells joined by a digit that has only two spots in a house | Master |
| X-Chain | A chain of one digit through houses where it has two spots; one end must hold it | Master |
| XY-Chain | A chain of two-candidate cells; one end must hold the end digit | Master |
| Finned Swordfish | A Swordfish with a fin in one box | Master |
| AIC | A chain that mixes digits, cells and houses, alternating strong and weak links | Master |
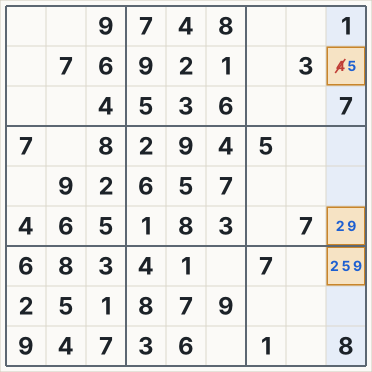
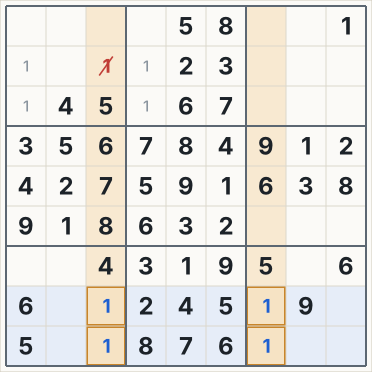
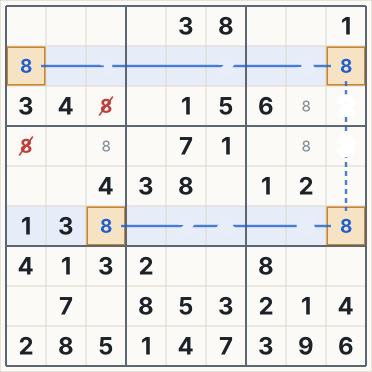
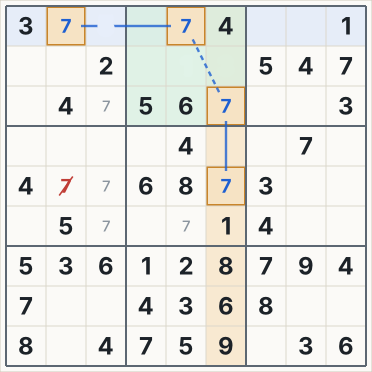
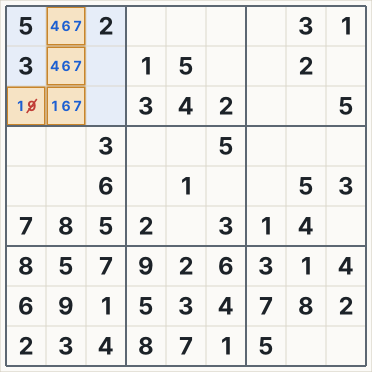
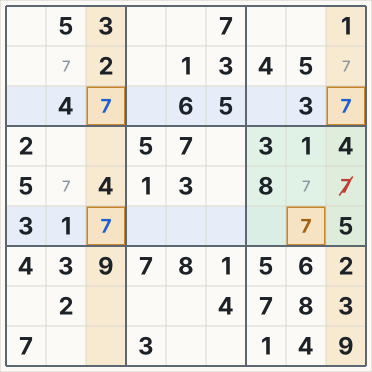
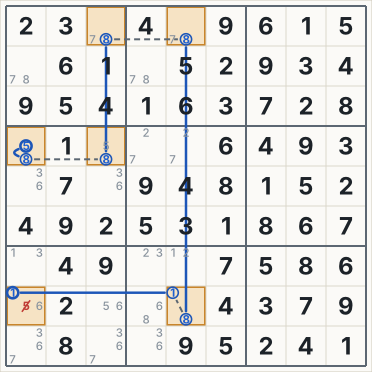
How to read the figures: the caption names the cell or house, quotes the Hint panel and gives the bank number of the puzzle, counted from 0 within its level. Orange cells are the pattern. Red struck-out digits are the candidates that go. In the Master figures the small digits are the candidates (the notes), the chain is drawn as in the game (rings on its candidates, solid lines for strong links, dashed lines for weak links, thicker rings at the two ends). In the finned-fish figures the fin’s digit is amber and the fin’s box is tinted green. At these exact boards the hint may start with a simpler technique, because each figure isolates one pattern. The game also reshuffles every puzzle before it shows it, so you will not meet these exact boards in play. The techniques are the same.
Naked Single
A Naked Single is a cell with only one candidate left. Early in a puzzle that happens because its row, column and box already hold the other eight digits. Later, the eliminations described below can also leave a cell with a single candidate, as in several figures on this page. Every puzzle in our bank uses this technique, at every level.
To find one, look at crowded places first. A cell in a nearly full row and column is the likeliest to have one candidate left. In Easy, 76.2% of puzzles use nothing harder than this on our solver’s path.
Hidden Single
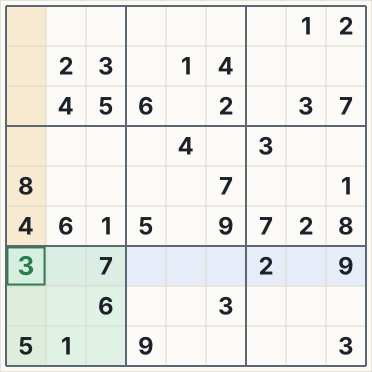
A Hidden Single hides among other candidates. The cell may still allow several digits, but one digit has nowhere else to go in its box, row or column.
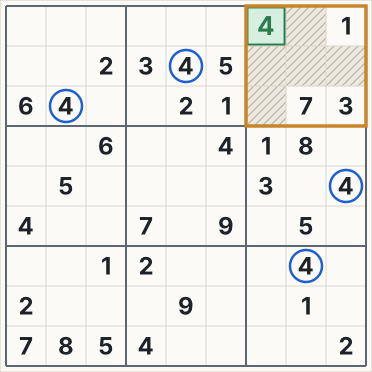
Pick a digit and find where its copies already stand. Use their rows and columns to block cells in a box. If one open cell is left, the digit belongs there. In the figure below, four 4s block every other open cell in the top-right box. 23.8% of Easy puzzles use it. By Medium it appears in 99.4% of puzzles.
Pointing
Pointing is the first technique that removes candidates instead of placing a digit. Suppose every spot for a 4 inside a box lies on one row. The 4 of that box must then be in that row, so no other cell of the row can be a 4. The box’s candidates point along the line. The same works for a column. Other guides call this Locked Candidates or a Pointing Pair.
You need notes to see it. Look for a digit whose notes inside a box all share one row or column. It appears in 88.4% of Medium puzzles.
Claiming
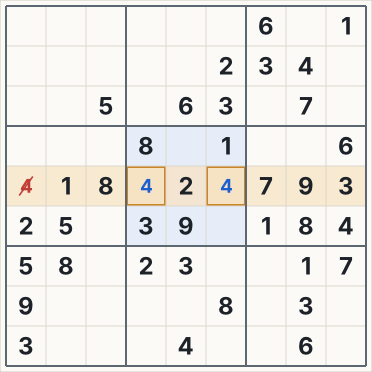
Claiming runs the other way. If every spot for a digit in a row lies inside one box, the digit of that row has to land in that box. The same works for a column. The rest of the box cannot hold the digit. Some guides call this Box/Line Reduction.
Scan a row’s or column’s notes for a digit that is confined to one box. Claiming appears in 41.2% of Medium puzzles and 51.6% of Expert puzzles.
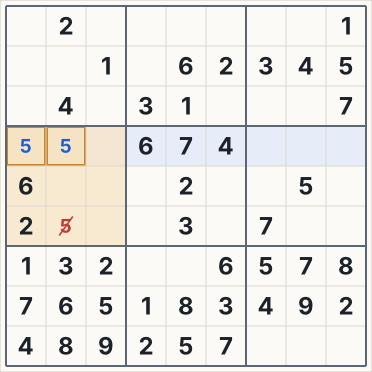
Naked Pair
A Naked Pair is two cells in the same house that can only be the same two digits. Those digits must fill those two cells. No other cell in the house can use either one.
Look for two cells with identical two-digit notes. This is the first pattern where you compare the full notes of several cells, not just one digit. 30% of Medium puzzles use it, rising to 59% at Expert.
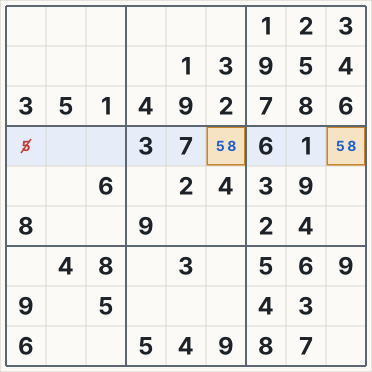
Hidden Pair
A Hidden Pair is the mirror image of a Naked Pair. Two digits fit in only two cells of a house, though those cells may hold other candidates too. Both digits must go in those two cells, so every other candidate in them can be erased.
Hidden pairs are easy to miss because the cells look cluttered. Scan a house for two digits that share the same two cells and appear nowhere else. 57.8% of Hard puzzles use one.
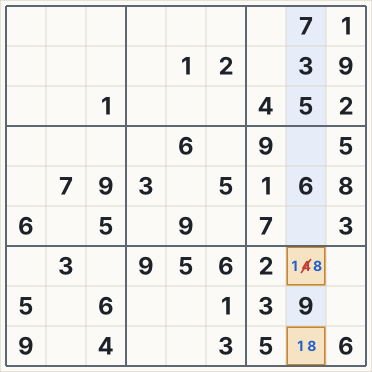
Naked Triple
A Naked Triple is three cells in a house whose candidates, taken together, are only three digits. The cells do not each need all three. Cells holding {5, 6}, {5, 7} and {6, 7} still form a triple, as in the figure. The three digits fill the three cells, so the rest of the house loses them.
27.8% of Hard puzzles use a Naked Triple.
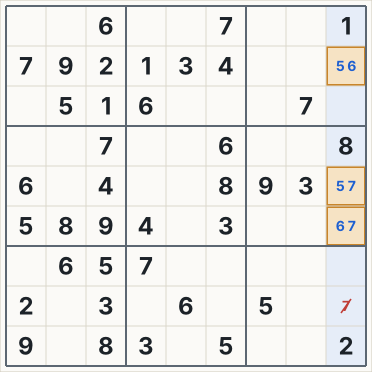
Hidden Triple
A Hidden Triple is three digits that fit in only three cells of a house. Those cells may carry other candidates, and those other candidates are the ones that go. The pattern is spread out and easy to overlook, so check for it after pairs and Naked Triples have run dry.
15% of Hard puzzles use one.
X-Wing
An X-Wing needs one digit with exactly two spots in each of two rows, and those spots must fall in the same two columns. The four spots form a rectangle. Whichever diagonal holds the digit, both columns are used up, so the digit can be removed from the rest of those columns. The same works with rows and columns swapped.
To look for one, take a digit and list the rows where it has exactly two spots. Compare their columns. 20% of Hard puzzles use an X-Wing.
Skyscraper
A Skyscraper links two lines through one digit. In two rows (or two columns), the digit has exactly two spots each, and one spot from each lines up in the same column (or row). That shared line is the base. The other two spots are the roofs. The two base spots cannot both be the digit, so at least one roof is.
Any cell that sees both roofs loses the digit. It is the most common of the Expert-level techniques in our bank: 67.8% of Expert puzzles use one.
2-String Kite
A 2-String Kite joins a row and a column. The digit has exactly two spots in the row and exactly two in the column, and one spot from each lands in the same box. Those two box spots cannot both be the digit. So at least one of the two free ends is, and any cell that sees both free ends loses it.
It appears in 51.2% of Expert puzzles.
Swordfish
A Swordfish is an X-Wing with three rows and three columns. Each of the three rows may have two or three spots for the digit, as long as all of them fall inside the same three columns. Three rows need three copies of the digit, and only three columns are available, so the rest of those columns lose it. The same works with rows and columns swapped.
It is rare: 11.4% of Expert puzzles use one.
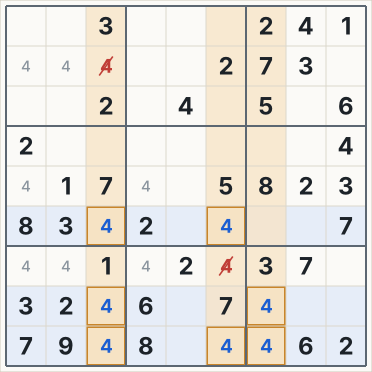
XY-Wing
An XY-Wing uses three cells with two candidates each. The pivot holds X and Y. One wing holds X and Z, the other holds Y and Z, and both wings see the pivot. If the pivot is X, the first wing becomes Z. If it is Y, the second wing does. Either way a Z lands in a wing.
So any cell that sees both wings cannot be Z. Look for the pivot first: a two-candidate cell that sees two other two-candidate cells. 36.2% of Expert puzzles use an XY-Wing.
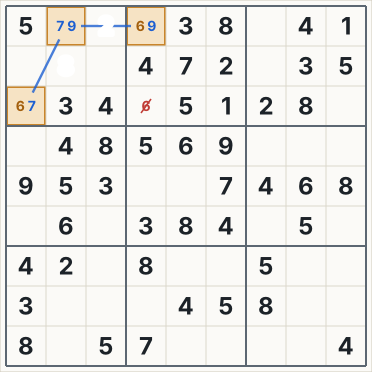
XYZ-Wing
An XYZ-Wing is the XY-Wing with a fuller pivot. The pivot holds X, Y and Z. One wing holds X and Z, the other holds Y and Z, and both wings see the pivot. Whatever the pivot turns out to be, a Z ends up in the pivot or in a wing.
A cell that sees all three of them cannot be Z. Few cells can see all three at once, so the search is short once you have the pivot. 23% of Expert puzzles use one.
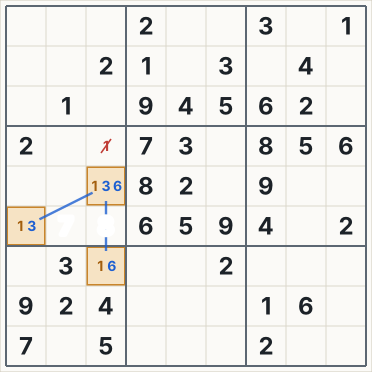
Naked Quad and Hidden Quad
Quads extend the pair and triple logic to four cells and four digits. They are rare in our bank: 2.8% of Expert puzzles use a Naked Quad and 0.4% use a Hidden Quad.
Here is a shortcut for them. In a house with n empty cells, a naked group of k cells always goes together with a hidden group in the other n − k cells. If a quad is hard to see, look for the pair or triple on the other side. The two figures show one of each. In the second, the Hidden Quad sits in a box with six empty cells, so the two cells outside it can only hold the box’s other two missing digits, 8 and 9. That is the matching pair.
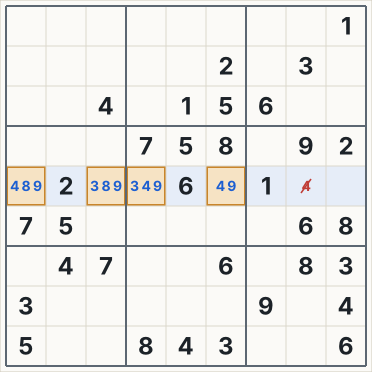
Finned X-Wing
A Finned X-Wing is an X-Wing with a few extra spots for the digit, the fin, all inside one box. Either the X-Wing holds or the fin has the digit. So only a cell that lies in one of the X-Wing’s cross lines and also sees the whole fin loses it: in practice, the cells of those lines inside the fin’s box. The solver tries it first of the Master techniques, and 49.4% of Master puzzles use one.
W-Wing
Two cells hold only the same two candidates, say 1 and 3. If 3 has just two spots in some house, and each spot sees one of the two cells, then one of the cells cannot be 3 and must be 1. A cell that sees both loses its 1. At 56%, this is the Master technique the most Master puzzles use.
How chains work
The other Master techniques are chains (the W-Wing is a short one). A strong link joins two candidates of which at least one is true: a digit’s only two spots in a house, or a cell’s only two candidates. A weak link joins two candidates that cannot both be true. A chain alternates them and starts and ends with a strong link, so if one end is false, the links force the other end to be true. Anything that conflicts with both ends can go. Our Master chains have 3, 5 or 7 links, never more: of the 1,478 chain steps in the bank’s solving paths, 29 have 3, 832 have 5 and 617 have 7.
X-Chain
An X-Chain uses one digit. Its strong links are houses where the digit has two spots, its weak links join spots that see each other, and a cell that sees both ends loses the digit. The Skyscraper and the 2-String Kite are 3-link X-Chains. 18.6% of Master puzzles use one.
XY-Chain
An XY-Chain runs through two-candidate cells. The link inside each cell is strong, weak links join equal digits in cells that see each other, and both ends carry the same digit. An XY-Wing is a 3-cell XY-Chain. 38.2% of Master puzzles use one.
Finned Swordfish
A Swordfish with a fin, cleared the same way as the Finned X-Wing. It is the rarest Master technique: 7.8% of Master puzzles use one.
AIC
An AIC (Alternating Inference Chain) mixes both kinds of strong link, so it can change digit inside a cell. Our solver accepts three kinds of ends, and never uses grouped links or loops:
- The same digit in two cells: a cell that sees both ends loses it.
- Two digits of one cell: that cell loses its other candidates.
- Two digits in two cells that see each other: neither cell can be the other’s digit.
The solver tries AIC last. It is the hardest step in 30% of Master puzzles, the largest share.
The levels
A level is set by technique, not by how many digits you are given. We grade each puzzle by the hardest technique on its cheapest-first solving path. The solver always plays the easiest available move first, and the puzzle’s level is the most demanding technique it ever had to use. In the second table below, a technique counts for a puzzle if it appears at least once on that path.
| Level | Hardest technique on the solving path (share of its 500) | Clues (range, mean) |
|---|---|---|
| Easy | Naked Single 76.2%, Hidden Single 23.8% | 32–38, mean 35.0 |
| Medium | Pointing 40%, Claiming 30%, Naked Pair 30% | 28–32, mean 29.3 |
| Hard | Hidden Pair 40%, Naked Triple 25%, Hidden Triple 15%, X-Wing 20% | 24–30, mean 26.1 |
| Expert | Skyscraper 22.2%, 2-String Kite 22.2%, Swordfish 8.4%, XY-Wing 22%, XYZ-Wing 22%, Naked Quad 2.8%, Hidden Quad 0.4% | 22–28, mean 25.6 |
| Master | Finned X-Wing 12%, W-Wing 20%, X-Chain 8%, XY-Chain 25%, Finned Swordfish 5%, AIC 30% | 22–26, mean 24.8 |
What each level asks of you:
- Easy: singles only. 76.2% of Easy puzzles use nothing beyond Naked Singles.
- Medium: adds Pointing, Claiming and Naked Pairs, so notes start to pay off.
- Hard: adds Hidden Pairs, triples and the X-Wing.
- Expert: adds the wings, fish and chain-like patterns (Skyscraper, 2-String Kite, Swordfish, XY-Wing, XYZ-Wing) and the quads. On our solver’s path, every Expert puzzle as stored uses an Expert-level technique at least twice (2.66 times on average).
- Master: adds finned fish and chains (Finned X-Wing, W-Wing, X-Chain, XY-Chain, Finned Swordfish, AIC). No chain in any Master puzzle is longer than 7 links. Every Master puzzle as stored uses a Master technique at least twice (3.75 times on average).
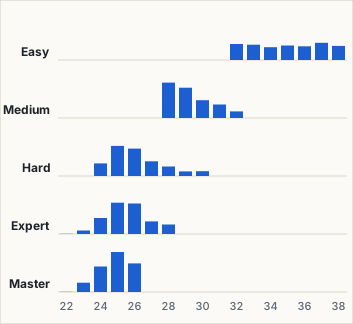
The clue counts overlap between neighboring levels, as the chart shows. Medium and Hard both include puzzles with 28 to 30 digits, Hard and Expert both include puzzles with 24 to 28, and Expert and Master both include puzzles with 22 to 26. Technique, not the count of blanks, sets the level.
How often each technique appears on a puzzle’s solving path, by level:
| Technique | Easy | Medium | Hard | Expert | Master |
|---|---|---|---|---|---|
| Naked Single | 100% | 100% | 100% | 100% | 100% |
| Hidden Single | 24% | 99% | 100% | 100% | 100% |
| Pointing | – | 88% | 90% | 85% | 93% |
| Claiming | – | 41% | 49% | 52% | 60% |
| Naked Pair | – | 30% | 45% | 59% | 57% |
| Hidden Pair | – | – | 58% | 35% | 41% |
| Naked Triple | – | – | 28% | 8% | 14% |
| Hidden Triple | – | – | 15% | 3% | 4% |
| X-Wing | – | – | 20% | 22% | 19% |
| Skyscraper | – | – | – | 68% | 28% |
| 2-String Kite | – | – | – | 51% | 44% |
| Swordfish | – | – | – | 11% | 6% |
| XY-Wing | – | – | – | 36% | 36% |
| XYZ-Wing | – | – | – | 23% | 22% |
| Naked Quad | – | – | – | 3% | 1% |
| Hidden Quad | – | – | – | <1% | – |
| Finned X-Wing | – | – | – | – | 49% |
| W-Wing | – | – | – | – | 56% |
| X-Chain | – | – | – | – | 19% |
| XY-Chain | – | – | – | – | 38% |
| Finned Swordfish | – | – | – | – | 8% |
| AIC | – | – | – | – | 30% |
A solving step is one placement or one elimination on that path. Easy puzzles need only placements, so their step count equals the number of blank cells. The harder levels need extra elimination steps.
| Level | Solving steps per puzzle (mean, range) | Steps that need the level’s own techniques (mean) |
|---|---|---|
| Easy | 46.0 (43–49) | – |
| Medium | 54.5 (50–63) | – |
| Hard | 60.5 (52–75) | – |
| Expert | 63.1 (55–75) | 2.66 |
| Master | 68.0 (57–89) | 3.75 |
For Master, the longest chain each puzzle needs on its solving path, and how many of its steps need a Master technique:
| Master puzzles (of 500) | Count | Share |
|---|---|---|
| Longest chain: 3 links | 2 | 0.4% |
| Longest chain: 5 links | 163 | 32.6% |
| Longest chain: 7 links | 268 | 53.6% |
| No chain at all (only finned fish) | 67 | 13.4% |
| Master techniques used 2 times | 223 | 44.6% |
| Master techniques used 3 times | 96 | 19.2% |
| Master techniques used 4 times | 61 | 12.2% |
| Master techniques used 5 times | 36 | 7.2% |
| Master techniques used 6 or more times | 84 | 16.8% |
All counts are computed from the puzzles themselves, not from player data.
How we build and check the puzzles
- Our own puzzles. They come from our own seeded generator and grader. We use no third-party puzzles or puzzle lists.
- Method. The generator starts from a random complete grid and removes digits one at a time. It keeps a removal only if the solution stays unique and the level’s techniques can still finish the puzzle. We then pick 500 puzzles per level by quota on the hardest technique.
- Audit. Every stored puzzle is re-checked from scratch. All 2,500 puzzles have exactly one solution, and all 2,500 are solved by our techniques without guessing. Every solving step agrees with the solution.
- A second check for Master. A separate, deliberately simple program re-checks every Master step: the links really are strong and weak, they alternate, no candidate repeats, and the crossed-out candidates are exactly the ones the chain rules out. A brute-force search confirms that every X-Chain, XY-Chain and AIC the solver picks is as short as any on that board.
- No repeats. We compare puzzles in a canonical form, where renamed digits, swapped rows, columns and bands, and a flipped board count as one. The bank holds 0 duplicates.
- Reshuffling. Before you see a puzzle, the game renames its digits, swaps rows and columns, and may flip it. We graded 20 reshuffled versions of every puzzle. The level and the hardest technique never changed.
- The hint uses the same solver. It searches only within the techniques of the puzzle’s level, so the technique it names is one that level allows.
Frequently asked questions
Does a Sudoku puzzle have only one solution?
A well-posed one does. Wikipedia describes the setter’s partly filled grid as one that, “for a well-posed puzzle, has a single solution.” Every puzzle on this page is checked: all 2,500 in our bank have exactly one solution.
Do I ever have to guess in Sudoku?
Not in these puzzles. Some puzzles elsewhere need trial and error or very long chains. Ours are built and checked so that every one can be solved with the techniques above, with chains of at most 7 links on Master. If you are stuck, the hint names the technique you are missing.
What is the hardest level?
Master, the only level that needs finned fish and chains of up to 7 links. Its puzzles take 68.0 solving steps on average, against 63.1 for Expert. It is in free play only, never the daily puzzle.
Is Master solvable without guessing?
Yes. A chain is a short proof, not a guess: if one end is false, the links force the other end to be true. Our solver never tries a digit to see what happens and uses no forcing chains, and every Master puzzle is checked to finish with the techniques on this page.
Do I need Unique Rectangles?
No. A Unique Rectangle relies on the puzzle having one solution, which is true here, so you may use it. But our solver never does, every Master puzzle is checked to be solvable without it, and the hint never asks for one.
How many Sudoku puzzles are there?
Our bank holds 500 puzzles per level, 2,500 across Easy, Medium, Hard, Expert and Master. The game reshuffles each one before showing it. In mathematical terms, there are 6,670,903,752,021,072,936,960 valid completed grids, about 6.67 × 10²¹ (Wikipedia, checked 2026-10-18). A puzzle is made by choosing which digits of a completed grid to show, so the number of possible puzzles is larger still.
What is the minimum number of clues in a Sudoku?
17, for a puzzle with a unique solution. Gary McGuire, Bastian Tugemann and Gilles Civario proved it with an exhaustive computer search that found no 16-clue puzzle (arXiv:1201.0749, checked 2026-10-18). Our puzzles start with between 22 and 38 digits.
What is the difference between the levels?
The techniques our solver uses to finish the puzzle. Easy uses singles only. Medium adds Pointing, Claiming and Naked Pairs. Hard adds Hidden Pairs, triples and the X-Wing. Expert adds wings, fish and chain-like patterns. Master adds finned fish and true chains of up to 7 links. The number of starting digits overlaps between levels, so it is not the measure. The level tables above show the exact shares.
When should I use notes?
Use them when the singles stop. Easy puzzles use only singles, which you can find by scanning. From Medium on, techniques such as Pointing and Naked Pair work on candidates, so notes pay off. Fill all notes writes them in for you, and the result screen records that you used it.
Who invented Sudoku?
The modern puzzle was most likely designed anonymously by Howard Garns. It was first published in 1979 by Dell Magazines under the name Number Place (Wikipedia, checked 2026-10-18).
Do hints count against my record?
Only Fill it in does, and taking it back with Undo does not remove it from the count. Viewing where to look and how the technique works is free. Your record shows how many puzzles you solved without any hint, per level, and it stays in your browser on this device.
Sources and checks
Everything in this section was checked on 2026-10-18.
- Completed grids: Wikipedia, Mathematics of Sudoku: “the number of filled grids is 6,670,903,752,021,072,936,960 (6.671×10²¹).”
- Minimum clues: G. McGuire, B. Tugemann and G. Civario, There is no 16-Clue Sudoku: Solving the Sudoku Minimum Number of Clues Problem, arXiv, first submitted 1 January 2012: “We have performed an exhaustive computer search for 16-clue sudoku puzzles, and did not find any, thus proving that the answer is indeed 17.” Wikipedia’s Mathematics of Sudoku states the same result for proper puzzles, and defines a proper puzzle as one with a unique solution.
- Origin and single solution: Wikipedia, Sudoku: “The modern sudoku was most likely designed anonymously by Howard Garns” and “first published in 1979 by Dell Magazines as Number Place.” It also states that the grid, “for a well-posed puzzle, has a single solution.”
- Puzzle counts, level tables and figures: computed from our own puzzle bank. The figures are drawn with the same solver code that powers the in-game hint.
Last updated: October 18, 2026.